
Creating Workout Progressions
Creating progressions is easy with RYPT’s custom progression builder. The progression builder allows you to create multi-week progressions inside a single workout template and edit them quickly from a single view where you can visualize the progressions week-on-week. Streamlining your programming and making it faster to create and schedule programs, and reducing the number of workout templates you have to make your workout library more manageable.
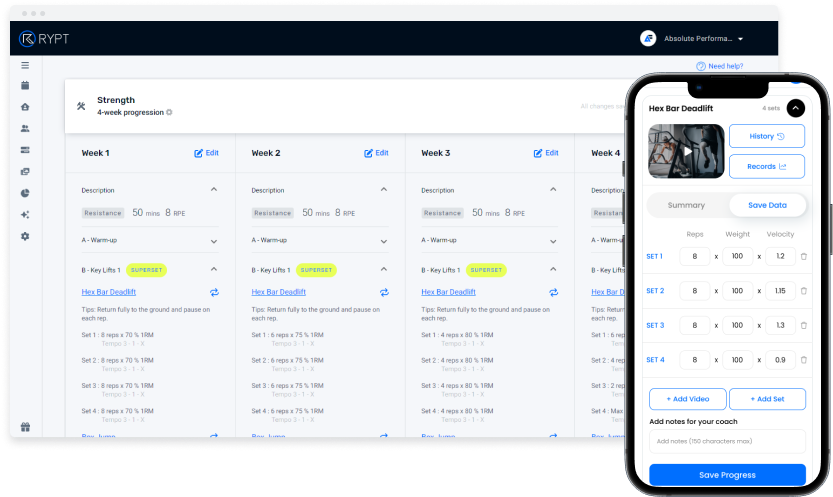
This video walks you through how to create progressions from your base workout including adding and editing the progressions, editing exercise data, replacing exercises, and then scheduling the progressions by adding them to the calendar or adding them to a program.
Video length: 3 mins 41 secs
Adding Progressions to a Workout
To add progressions, first, you need to create your base workout. Once your base workout is ready, follow these steps to add your progressions:
- Click on the “Add progressions” button under the workout name to add your progressions
- Select the number of weeks of progressions you’d like to add
- Click “Add progressions” to add the progressions
This will create copies of your base workout within the same template which can then be edited individually to change load, volume, intensity, or exercises to create your progressions.
Editing Progressions
Changing Load, Volume, or Intensity
To make quick changes to load, volume, or intensity, just click on the exercise name you’d like to edit. This opens the exercise in a pop-up where you can edit the exercise data. Use the arrows to navigate between weeks and build out your progression for that exercise.
Replacing Exercises
If you need to replace an exercise in one of your progressions, click the replace exercise icon to the right of the exercise name. This opens a pop-up where you can select an exercise to replace it with.
Making Bigger Changes
If you need to make bigger changes to a workout, to add a down week for example, click the “Edit” button to the right of the Week. This opens the workout in the workout builder where you can make any changes you need to. Once you’ve made your changes, click “Save and Exit” or “Back” to return to the progression builder.
Scheduling Progressions
There are two ways to schedule progressions:
Add Progressions to a client/athlete’s Calendar
Just like a workout template, progressions can be scheduled directly to a client/athlete’s calendar. Just follow these steps:
- Click the + on the day you’d like to start the progression
- Click “Add workout”
- Select the progression from your list of templates. Progressions will be identified by the progression icon and the number of weeks will be displayed with it.
- Click “Schedule” to schedule the progression. They will be scheduled for consecutive weeks starting from the date you selected.
Once the progressions have been scheduled they behave like regular workouts and can be updated or cancelled individually.
Add Progressions to a Program
Just like a workout template, progressions can be added to a program. Just follow these steps:
- Open the program builder
- Click the + on the day you’d like to start the progression
- Click “Add workout”
- Select the progression from your list of templates. Progressions will be identified by the progression icon and the number of weeks will be displayed with it.
- Click “Add workout to program” to add the progression. They will be added for consecutive weeks starting from the day you selected.
- Then schedule the program in the calendar as outlined above.